Do you want to start blogging? First, you’re required to know how to start a blog. The Internet is full of free blog sites like Blogspot, WordPress, Ghost, etc. Blogspot is Google’s free Blogger platform. Here, we are covering how to create a blog on Blogspot. Google Blogger allows you to create a blog on blogspot.com. It is easy to make a free Blogspot website. This article teaches you to create a blog for free and earn money online from Google without investment. Let’s take an introduction to the blog, blogging, and Google Blogspot (Blogger.com).
What Is A Blog?
A blog is a web-based diary that an individual or group of individuals regularly update with content. Each update on a blog is called a blog post. The blog posts can be based on a particular topic or various topics, depending on the blog’s niche. The latest posts on the blog appear first, i.e., they appear in reverse chronological order.
Why Do Blogging?
There are many reasons why people start blogging. To name a few –
- Supporting a social cause
- Professional networking
- Showcasing their writing skills
- Making money online without investment
- Marketing a business online.
Blogger Vs. Blogspot
Google owns both Blogger.com and Blogspot.com.
Is there any difference between Blogger and Blogspot?
- Blogger is a publishing platform, while blogspot.com is the root domain of your blog. Users create a blog on the blogspot.com subdomain. E.g., myblog.blogspot.com
- You can manage a blogspot blog using the Blogger dashboard.
What is Blogspot?
You can create a free blog on Blogspot to make money without investment. Google does not charge a penny from you. The best thing is that you can monetize a Blogspot blog with AdSense.
Advantages and Disadvantages of Blogspot
Blogspot blogs have some advantages and disadvantages, so you must know them before setting up a blog on blogspot.com.
Advantages of Blogger
- It is easier to use when compared to other blogging programs like WordPress
- Lots of options for customization
- Free of charge
- Faster indexing – Blogspot sites show up in Google search results within 24 hours
- Opportunity to make money with AdSense and other sources
- Can easily integrate any of the other Google products
- Option add your own custom domain.
- Free SSL certificate.
Disadvantages of Blogger
- Blogspot has fewer options for themes and plugins.
- You can easily lose traffic if you don’t keep updating your blog.
How to Sign Up for Google Account?
You can start blogging with Blogspot, but first, you need to create a Google account.
- Go to google.com in your web browser.
- Click on the Sign-in button to create an account.
- You are on the login page. If you have an account, log in with your email and password. Otherwise, proceed to create an account. You can create a Google account for yourself or manage your business. Select an option that is right for you.
- Fill out all the necessary details and click on the Next button.
- Once the account is created, you will see a welcome message.
How to Create A Blog on Blogspot?
Don’t know how to set up a blog on Blogspot? Don’t worry. Hereunder is all you want to know. Please read our guide carefully and practice with our screenshots.
1. To create a blogspot blog, a Blogspot login is required. Visit blogger.com for this.
2. Click the CREATE YOUR BLOG button and log in with your Google account credentials.
3. After Blogspot sign-in. You are now on the Blogger dashboard. The Create blog option is given to you on the top-left side.
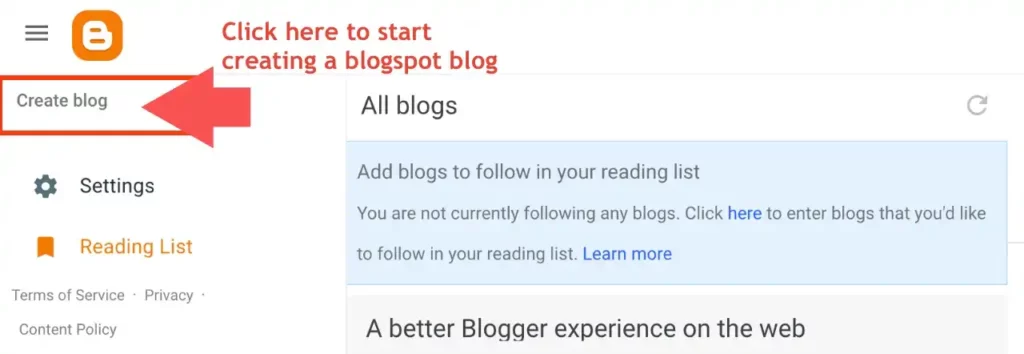
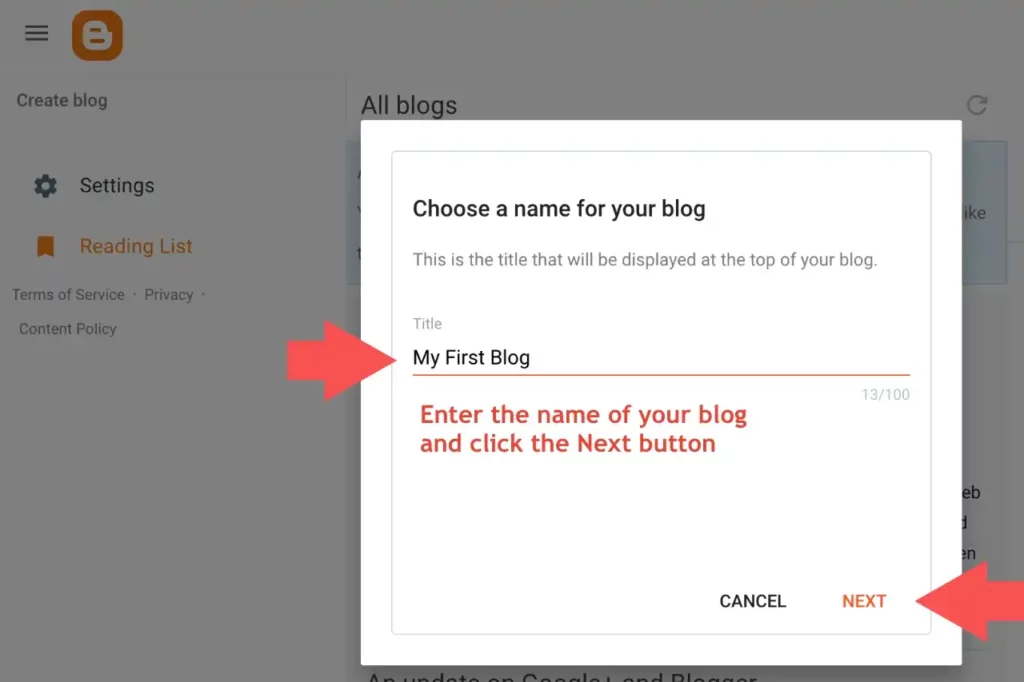
5. As you click on the Create blog option, you get a title box to choose a name for your blog. Enter the name of your new blog and click on the Next button. If you need help choosing a name for your blog, you can check out Satori Webmaster Academy’s blog name generator.
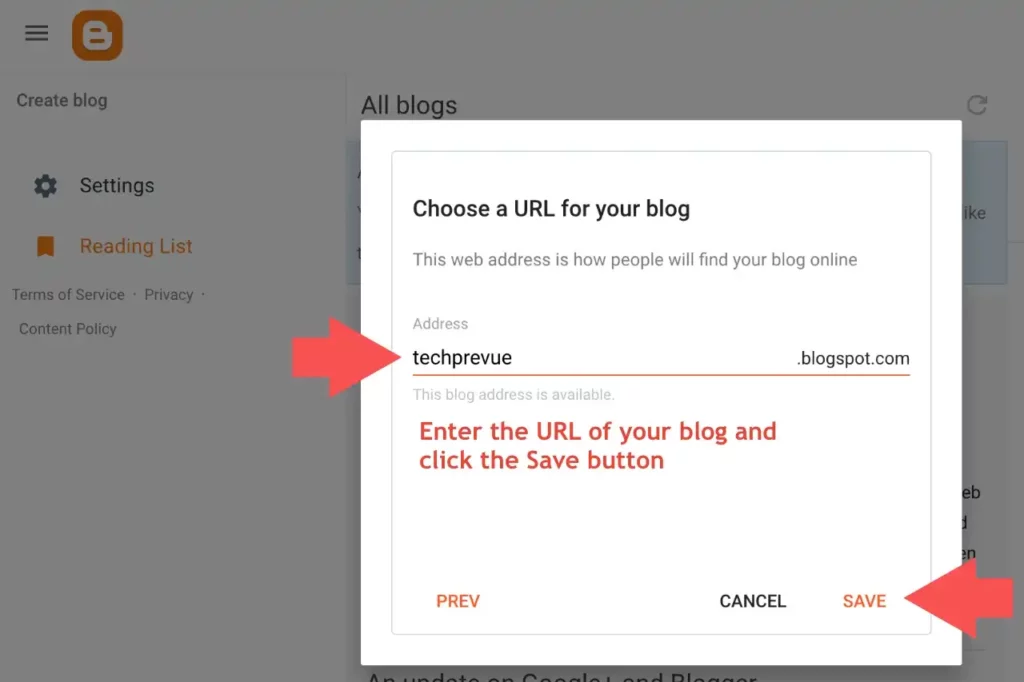
6. The next option is given to choose a URL for your blog. Enter the blog URL in the address box. It will be checked for availability, and if it is available, then the SAVE button will be highlighted. You can also set up a Blogger custom domain on a blogspot blog.
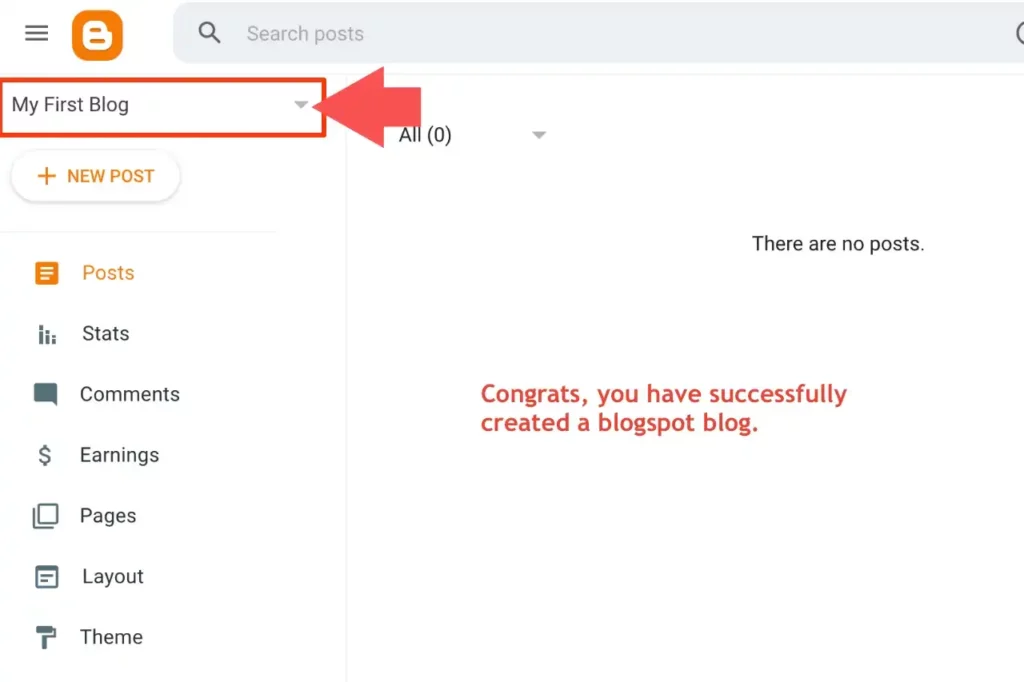
7. Congrats, you have successfully created a blogspot blog.
How to Change A Theme on Blogspot?
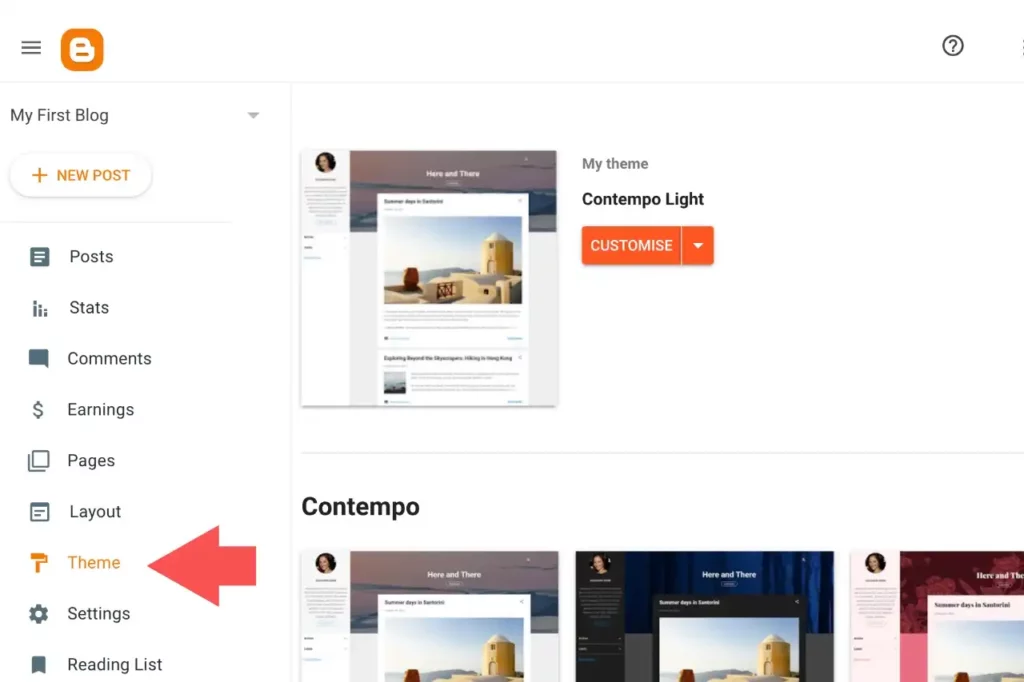
1. Click on the Theme menu item on the left side menu list. You see, the default theme is Contempo Light. You may change the Blogger theme at any time.
2. Just scroll down to choose the theme of your choice from the many available options. There are so many Blogspot themes, but we highly recommend using Contempo, Soho, Emporio, Notable, or Essential only. These themes are very fast. You can use Google’s PageSpeed Insight to check the loading speed and other issues. You get an option to preview the theme before applying.
You should take a backup of the existing blog theme before applying a new theme.
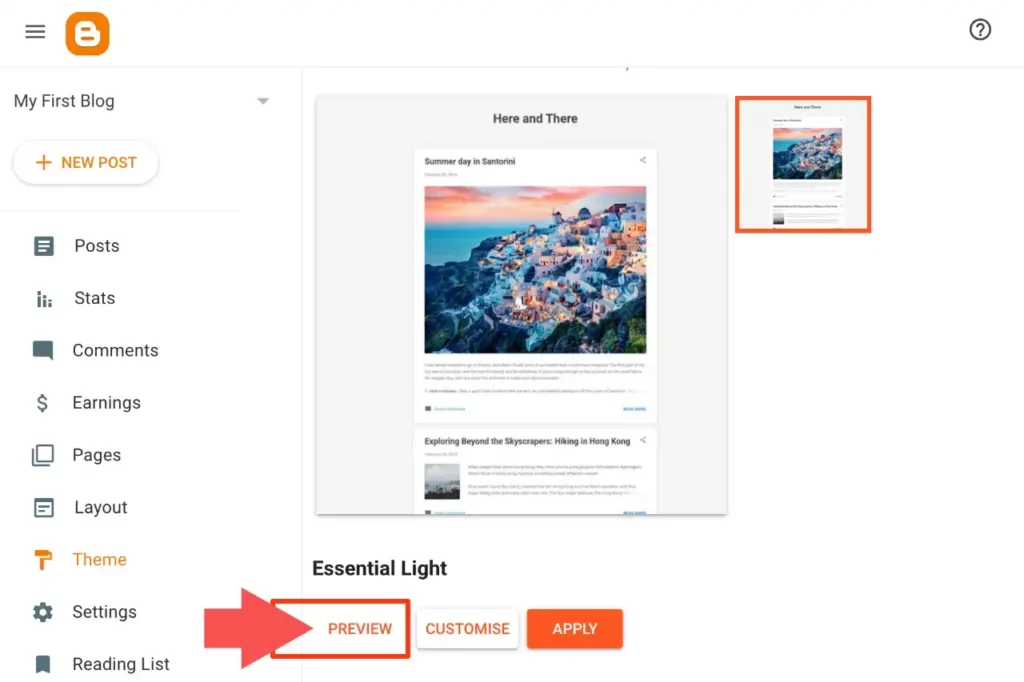
3. You need to click on the Apply button to use the selected theme.
You can also buy premium themes for blogspot blogs for beautiful design and customizations. Here’s our guide on how to install a blogger theme. You should also know the basics of Blogger’s HTML editor.
Is Your Blog Visible to Search Engines?
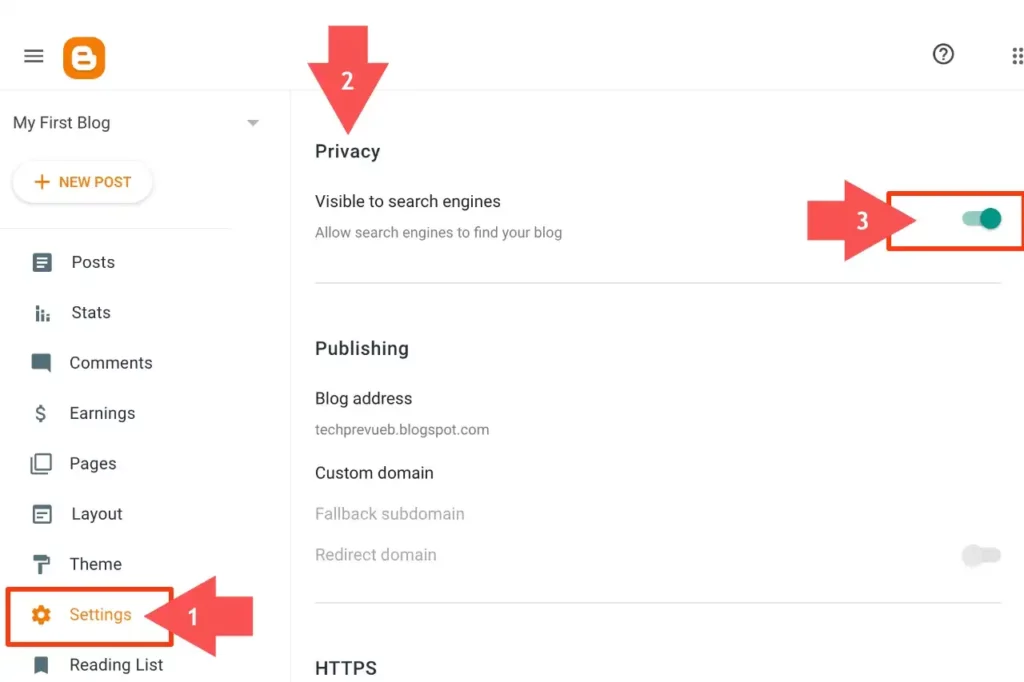
1. Click on the Settings menu item on the left sidebar.
2. Scroll your page to the Privacy section.
3. Double-check that the toggle button should be green.
We recommend learning about Blogspot/ Blogger SEO. If you are an advanced user, you can customize the robots.txt header tags and robots.txt.
How to Upload A Logo on Blogspot Blog?
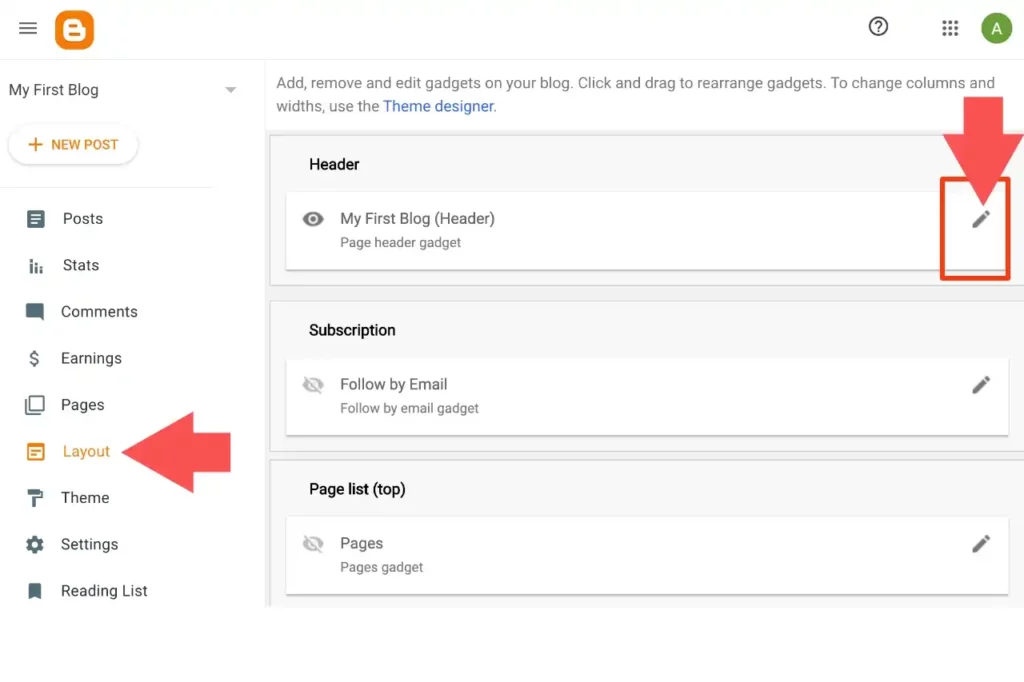
1. Click on the Layout menu item on the left side.
2. In the Header section, click on the edit pencil.
3. You can either choose a file from your computer or paste an image URL to upload a logo on your blog. You also have three options for logo placement; select the right for you.
- Behind the title and description
- Instead of a title and description
- Have a description placed after the image
- Shrink to fit
You can also tick the “Shrink to fit” option if the logo is bigger than the header.
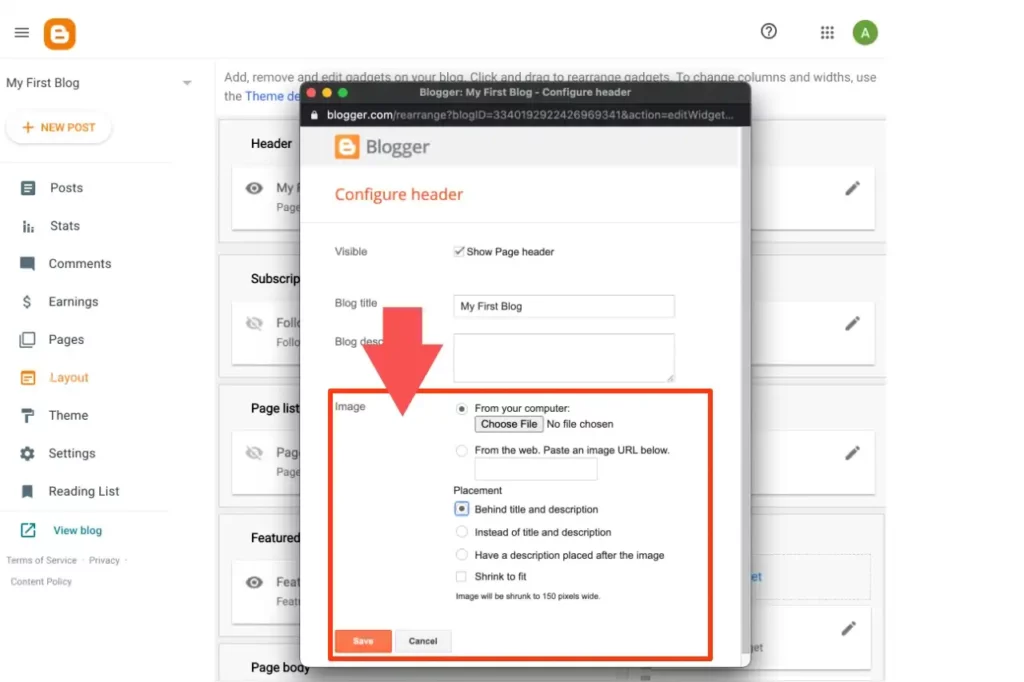
4. Click on the Save button to make changes.
Similar to a logo, a favicon also helps your blog to get identified among other blogs. You can also add a favicon on Blogspot blogs.
How to Add A Gadget on Blogspot?
1. Click on the Layout menu item on the left menu list.
2. Under the sidebar top or bottom, click on Add a Gadget.
3. In the pop-up window, scroll down to see available gadgets. Click on the name of Gadget or + icon to add a new gadget to your blog.
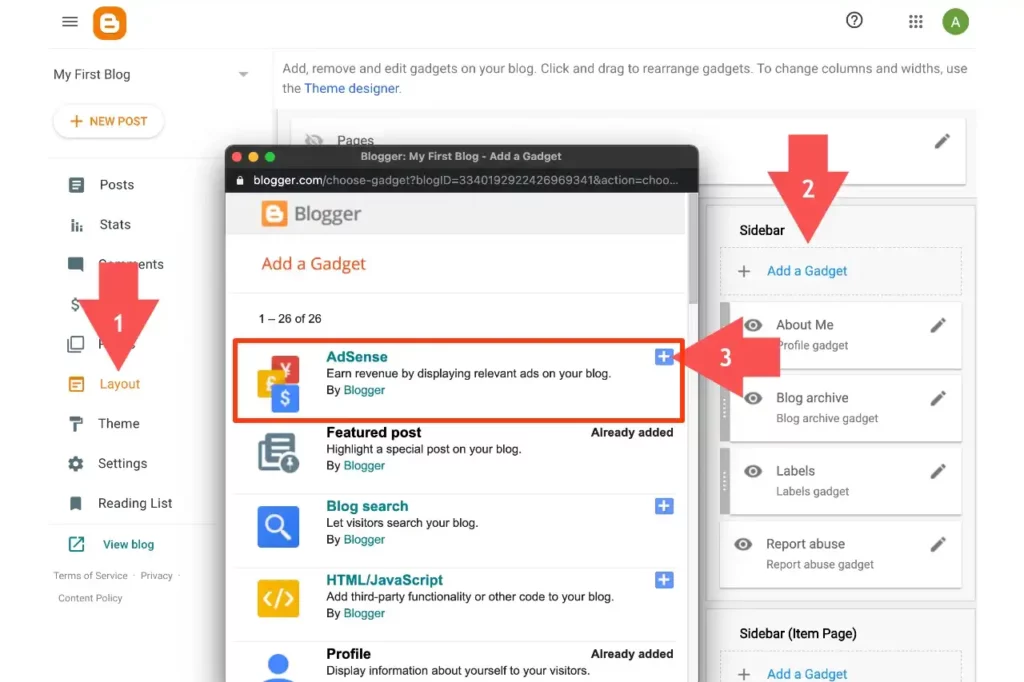
4. Update your gadget with the required information.
5. Click the Save button, and the gadget will be added to the sidebar.
How to Publish A Blog Post on Blogspot?
Publishing a blog post consists of different tasks. Hereunder, we are discussing a few of them.
Compose a new post
Click the New Post button to create a new post.

The blog post editor and toolbar
A post editor will open. The post editor has an HTML view and a Compose view. Click on the pencil icon on the composer toolbar to get these options. I recommend the compose view for beginners.
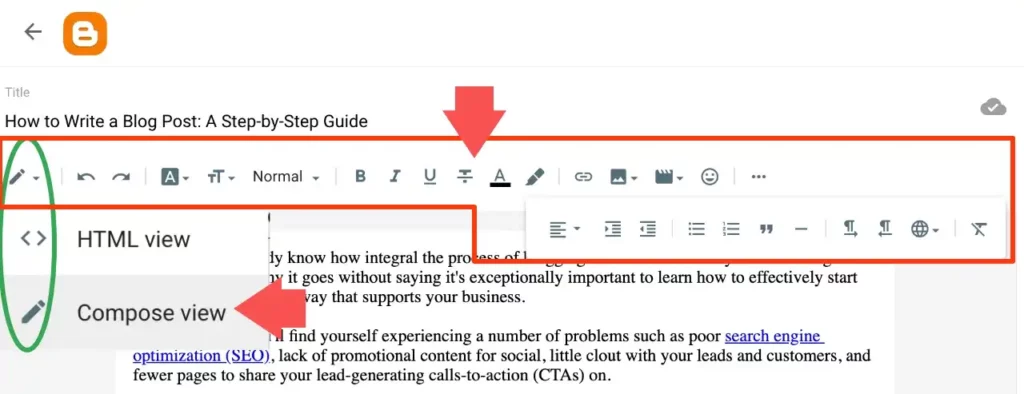
It has different sets of options-
- Toggle between HTML view and Compose view.
- Undo and Redo.
- Font type, font size, headings, and paragraph.
- Bold, italics, underline, strikethrough, text color, and text background color.
- Insert or edit links, insert images, insert videos, and insert special characters.
- Text alignment, increase indent, and decrease indent.
- Bulleted list, numbered list, quoted text, and insert jump break.
- Left to right layout, right to left layout, and input tools.
- Clear formatting.
Add content to a blog post
Enter your blog post title and article, and add images just like you do with a word processing tool.
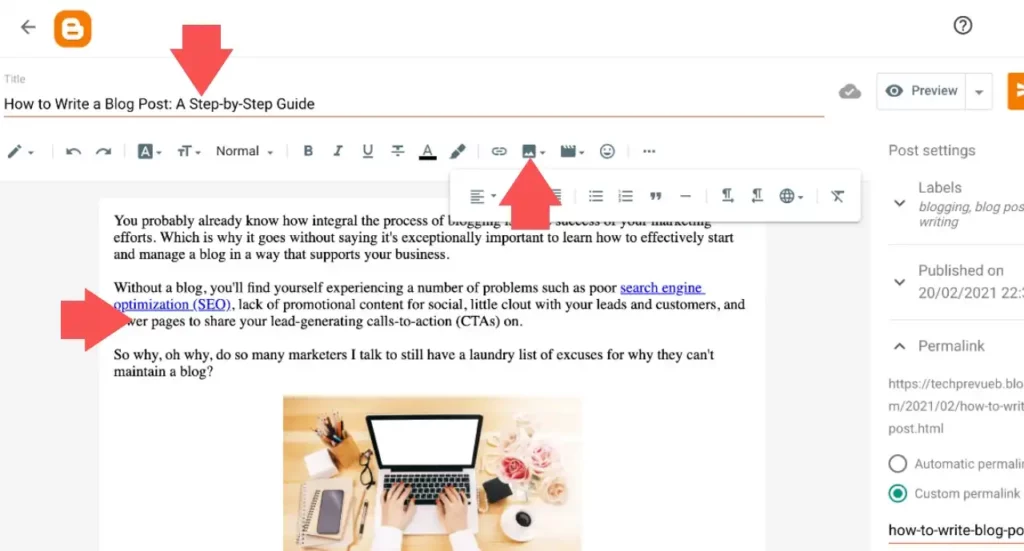
Insert an image into a blog post
1. Place the cursor at the spot where you want the image in a blog post.
2. Click on the image icon in the toolbar.
3. You get four options to add an image to your blog post.
- Upload from computer
- Photos
- Blogger
- By URL
If you want to upload images from your computer, click Choose Files and select the required image file.
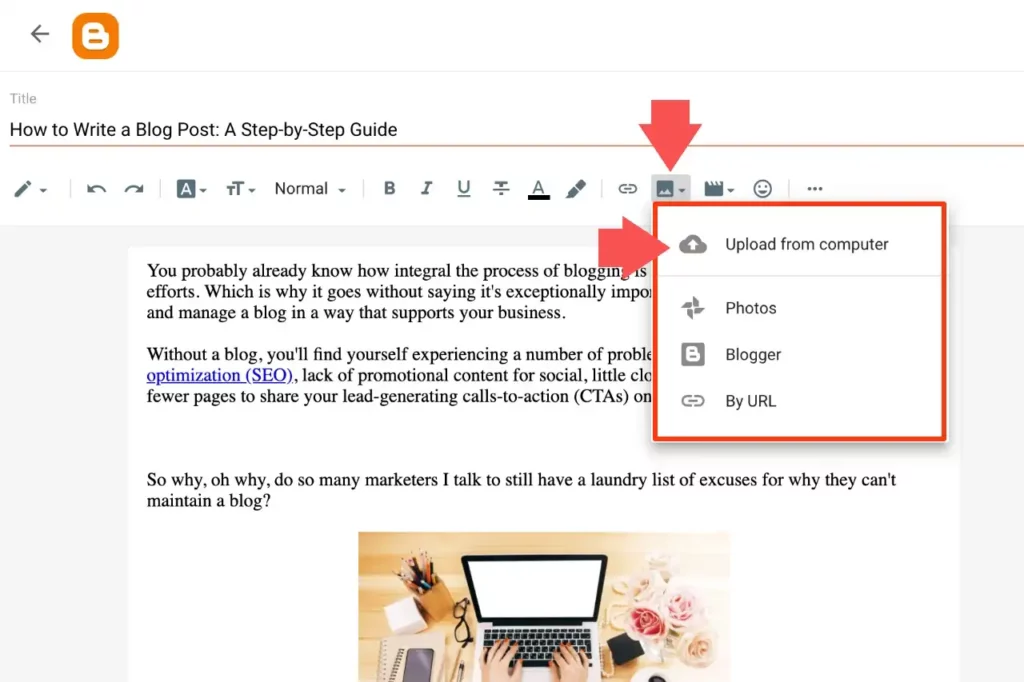
4. Click on the uploaded image to enter the Select button.
The required image will be added to your blog post.
Insert a link to a blog post
1. First, copy an internal or external URL to add.
2. Select a text with an internal or external URL to it.
3. Click on the link icon given on the composer toolbar.
4. An option to paste or search for a link will appear. Paste the copied URL in the given box.
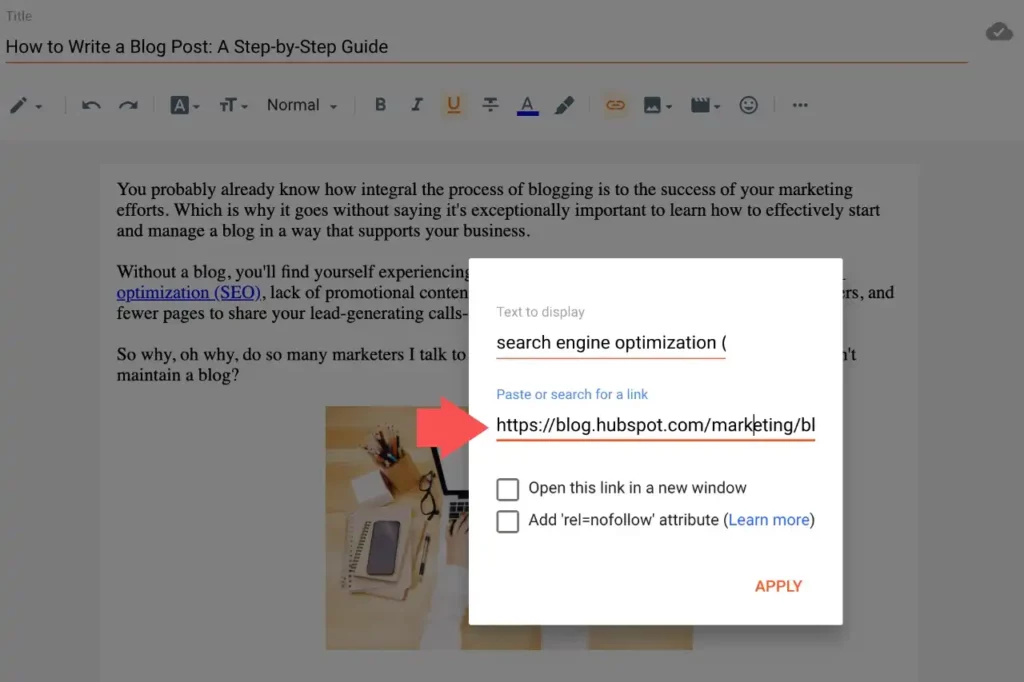
5. You get two options advanced options.
- Open this link in a new window
- Add ‘rel=nofollow’ attribute
You may use the first one without hesitation but don’t use it if you don’t know anything about a nofollow tag.
6. Click on the Apply button. A link has been added to your blog post.
You can edit this added link by clicking on the same text highlighted in blue color.
Embed YouTube videos to a blog post
1. Click on the Insert video icon on the given composer toolbar.
2. Drop-down will show the YouTube option. Click on it.
3. You get two options to add a video – Uploads and Search. Select the Search tab.
4. A search box to search YouTube videos. Search for a video and hit the magnifying glass button
5. Select a video from the populated list.
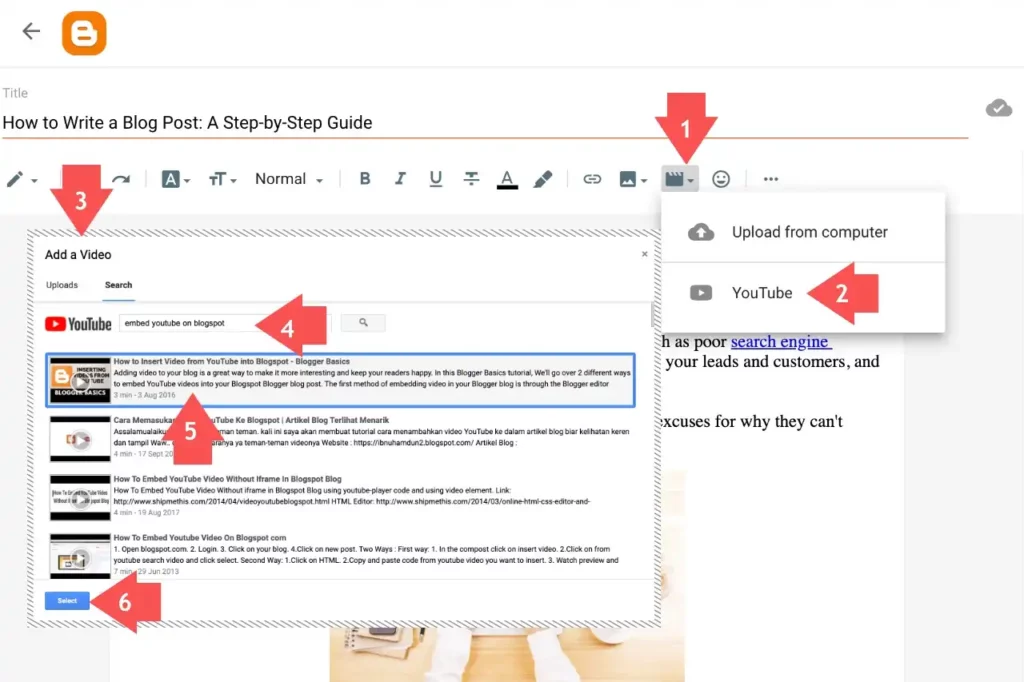
6. Click on the Select button. This video will be added to your video.
Add labels to a blog post
You can add labels to your blog post. The label is another term for the category or tag for your post. These labels show on the blog post. When a reader clicks on a label, all posts with that label will be on a page. Blogger has a label gadget that you can add to your blog sidebar. It will help your readers read all posts published under the same label.
1. You can add Labels from the Post settings given on the right sidebar.
2. Click on the Labels option. A box will appear to add labels.
3. Enter labels related to the post.
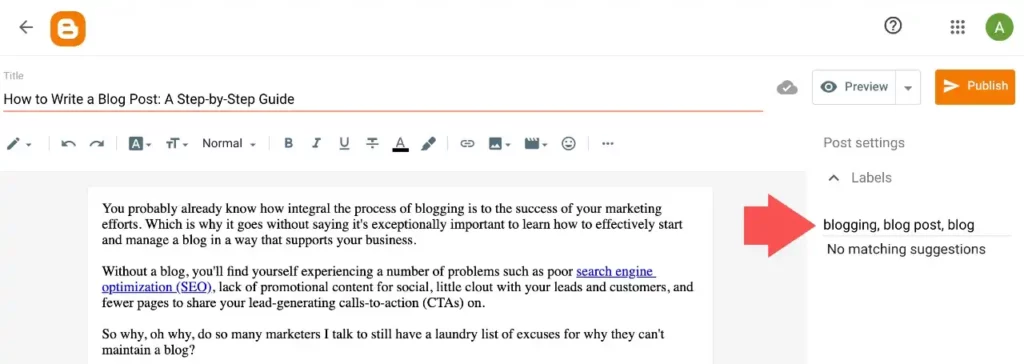
Great, you have done it perfectly.
Edit the permalink of a blog post
1. You can tweak your blog post permalink. This option is given under the Post settings.
2. Click on the Permalink option. It shows two options- automatic permalink and custom permalink.
3. You can use the custom permalink option to keep your blog post URL short and user-friendly.
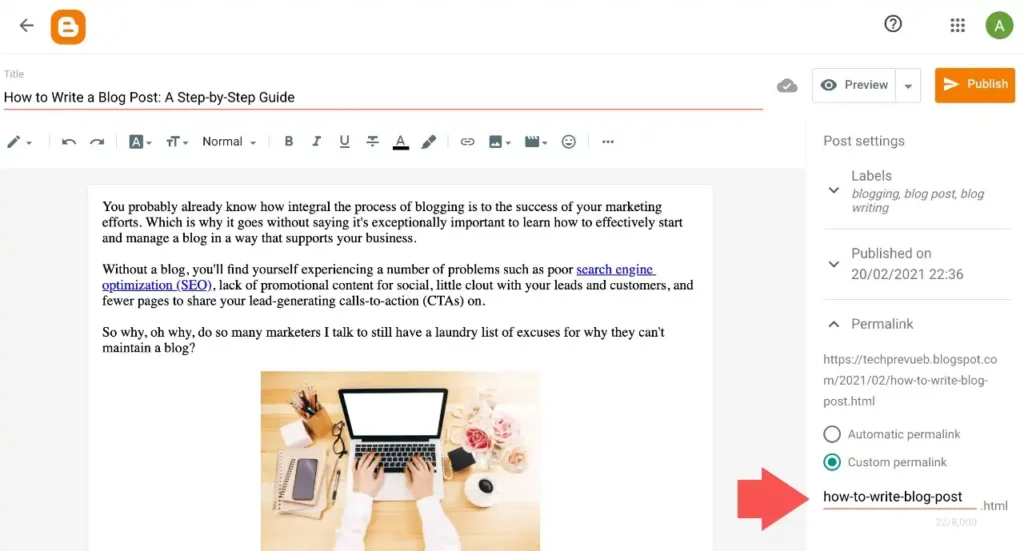
Read our detailed guides on –
Preview and publish a blog post
You can see the preview of your blog post before publishing it. You can do so by clicking on the Preview button in the top right corner.
If the post preview looks perfect, you can click on the Publish button.

How to Publish A Page on Blogspot?
Blogspot gives you options to add pages to your blog. You can publish a page on blogspot. You can create different types of pages like About Me, Contact Us, Privacy, Disclaimer, etc.
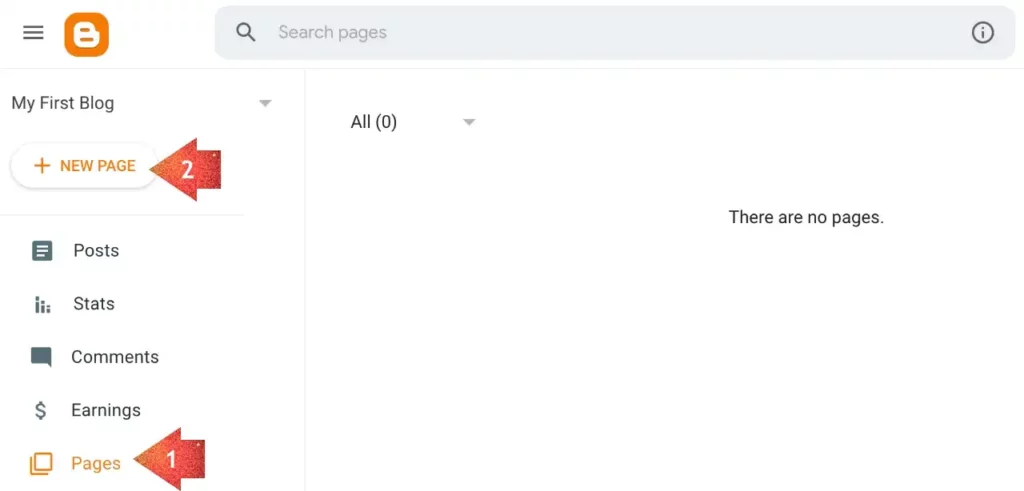
1. Click on the Pages menu item on the left side menu list.
2. Then click on the New Page.
3. Enter the page title.
4. Add content for the page.
5. You may disable reader comments on the pages.
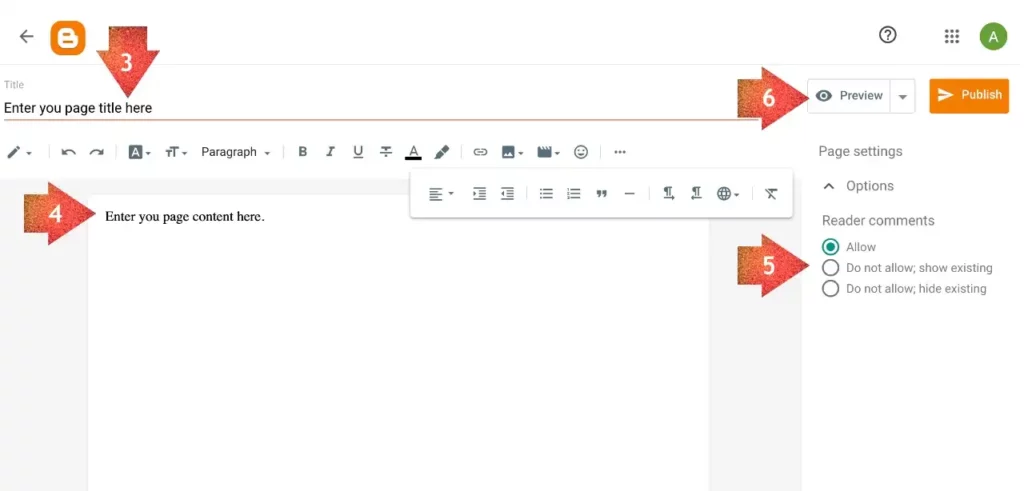
6. Preview and publish your page.
Do You Use Blogspot?
You have gone through our tutorial on how to create a blog on Blogspot, and now you can start blogging. Blogspot is one of the simple and free blogging platforms to create a blog for free. Everyone can create and set up a blog without any expertise. If you still have any questions in your mind, please leave a comment.

Very useful information. I use a blogspot blog.
Nice info, thanks. Blogspot blogs rock!
Blogspot is one of the best platforms, especially for those who are new to blogging. You don’t have to spend money to buy hosting. Another thing is that once you use Blogger, then WordPress becomes easy to use.
Very useful information with practical ways of making money online. I have always wanted to make a Blogspot and this article just opened my eyes to new online opportunities.
This is the first blog post I have read from you. I think I’ll be hanging out at your site from now on if I am serious about having a successful blog! I dig this site!
Hi Vinay,
Thanks for this beginner-friendly guide to starting my own blogspot blog.
Thank you so much
I started blogging, but I don’t have so much traffic to generate revenue. Please guide me, how I rank my Blogspot blogs on Google and the safest method to SEO. Where should I create backlinks?
This is really a very good blog post related to blogspot.com blogs, and thanks for sharing it with the community!
Thank u so much for this information. It is very helpful for beginners. I will create blogspot blogs for hobbies.
Thank You So Much for Your Support. I Had Successfully Registered With Blogger.com. Thank You Again.
Plz help me with Blogger SEO settings for my .blogspot.com
I came to your website through Google Search. I am quite impressed by the detailed, in-depth content you provide about Blogspot. Keep going!
Wow, very nice post. It describes Google Blogger in detail. Thanks for this post.
This is a very informative and useful post for a technical guy and the blogger. I read the post carefully to make my blogspot.com blog.
Very Nice blog and Helpful information about creating free blogspot blogs.
This article is useful to make a blog on blogspot.
Definitely a great piece of content. Blogger.com has been used for a long time by writers as the platform is fairly easy to use and offers amazing features.
Excellent information. This blog provides excellent information about blogging through blogspot.com. I have learned so much from this blog to increase the authority of my blog.
This is a really great blog about Google’s free blog blogspot. Thank you for sharing such a piece of useful information here in the blog.
Thank you so much for this wonderful guide here.
I have been using WordPress for some time now, and I have been experiencing an issue with it.
Now I have just come to see this guide about Blogspot. I will just take it as a personal guide to starting my blog.
I hope you can listen to me in case I have any other questions?
Very nice tips for a new blogger.
Is it worth giving time to Blogger, or should we go with WordPress? Which CMS is best out of these? Please suggest.
Blogspot is the best platform for personal blogging, and WordPress is best for those who want to invest and earn money. If your budget is not enough, you should consider Blogger because WordPress is the best CMS, but cheap hosting can make it awful.
Thank you for taking the time to write so clearly on Blogspot. I appreciate the efforts you have taken!
Can blogging help to grow my business? I have a website on digital marketing. Should I add a blogging page to it for its better performance?
No, you should not use Blogspot.
Yes, blogging is a good hobby. I love blogspot because it simple to set up and use.
Blogspot makes it easy for everyone to start their own blog. Its main benefit is that you connect with the relevant audience.
Thanks a lot for an informative post! You’ve briefly explained to create a free blog on the Blogger platform, and I also agree that blogger is best for start-up bloggers? Is it best for professionals?
Amazing post, now I will make my blog on blogspot.
How to link a page to my blog Post?
You may reread the post. All steps are mentioned.
This is my first timе visit аt heгe, and I am delighted to гead everything at single ⲣlace. Nobody wrote about blogspot in so much detail.
Yes, blogging is a good hobby. I love blogspot because it is simple to set up and use.
That’s great content and helped me to open a website on Blogger. I just created a blog because of this blog. Thanks again.
Thanks a lot for the very valuable information.
Thank you for this informative post.
Question –
Can one start a blog on Blogger from scratch using a smartphone?
Thank you.
Yes, why not. You can use the Blogger app.
Sir,
Thank you for this tutorial.
It is really helpful.
Thank you, Vinay, for posting this information. It is really very informative or helpful for those who don’t know how to create a blog, how to set it up, and all.
You explained everything very well. Keep posting!!!
Thanks for the very nice and useful information. Good explanation. It’s very helpful to me. Keep up the good job.
Wow, such a nice post.